Anywho, I hope you guys enjoy my PinchMe unboxing. It’s a pretty cool service, and if you are interested (which you should be – hello, free!), then register and get your own box here!
Have an amazing Christmas weekend if you celebrate!
Anywho, I hope you guys enjoy my PinchMe unboxing. It’s a pretty cool service, and if you are interested (which you should be – hello, free!), then register and get your own box here!
Have an amazing Christmas weekend if you celebrate!

So if you follow me on Instagram, you know that I took on not one, but TWO themed parties in the span of a week. Some may call it crazy, I call it a challenge. First off was our Great Gatsby New Years Eve bash. I had a lot of fun decorating our place with glitter, sequins and fringe, but lets be honest. What gets me most excited are the themed mani’s that come along with events!
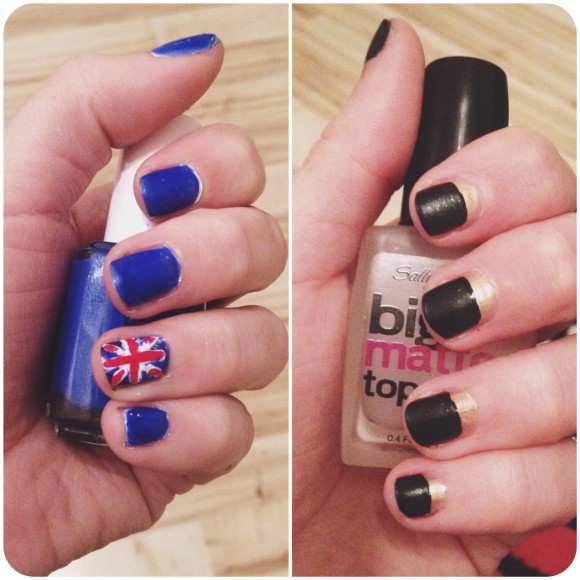
I didn’t have a whole lot of time, so I had to look over great tutorials, such as this one, before settling on the one you see above (reference). I have to say that it was a super easy manicure to achieve and it looked fantastic! I was complimented on it for days afterwards and it held up nicely.
Gatsby Nails
Two coats of Essie‘s Shifting Power
Two coats of China Glaze‘s Smoke & Ashes, stopping a little short to create the reverse french effect
One heaping coat of Sally Hansen‘s Big Matte Top Coat only over the black portion
Only a few days later, we hosted a viewing party for the new series of BBC’s Sherlock, which I can honestly say is my new favorite show. I have an unhealthy addiction to it and just can’t get enough. It’s been awhile since I’ve felt the fangirl burn inside of me so bright! Of course, I would have these feelings for a show that only airs 3 episodes every 2 years. I hate you, Moffat. But all that aside: FINGERNAILS (reference).
Sherlock Nails
One coat of Sinful Colors‘ Snow Me White (or any white polish) over all fingers except your accent
Three coats of Essie‘s Bouncer It’s Me on all nails
Create the Union Jack on your accent nail using a toothpick (it works even better than my dotting tools!)
For the red, I used Essie‘s Aperitif
Also, remember to exercise patience while trying to pull off these manicures. I often do not succeed, but I’m trying my best to learn to sit still! Doing nail art while watching a movie or TV show tends to help keep me occupied.

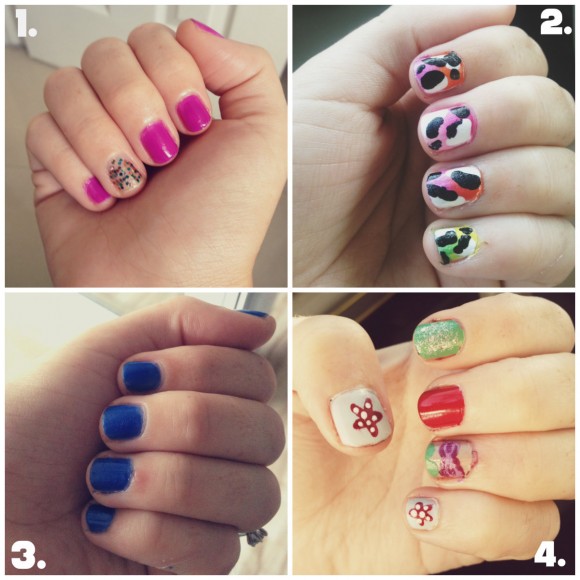
1. Party nails; So I am just not impressed with Essie’s new formulas lately! This is the second time I try a new summer shade (in this case, DJ Play That Song) where I have to apply a ton of coats for it to only be semi-opaque. What’s going on! So not impressed. I decided to add a party nail (because, well, why not) using O.P.I.’s The Living Daylights. They just blow Essie out of the water with their glitters, don’t they?
2. Leopard mani; I was SO excited to try this fabulous manicure from the lovely Jen Fabulous. It was so much fun to recreate, especially now that I have dotting tools! I first did an ombre over the nails and then used the tools to make the leopard spots randomly throughout the nails. I got so many compliments from strangers with this one – I can’t wait to do it again!
3. The Big Blue; Hated it! Yet another Essie flop this month. When I saw Bouncer It’s Me sitting on the shelves, I HAD to have it. It looked so vibrant and perfect for the summer. When it went on though, it was a different story. So blah and flat. I was not impressed. I actually liked it a lot better on my toes than on my nails. The more I try these neons, the more I think that they need to be layered over a white base to really have the impact they are meant to have.
4. Little Mermaid nails; This was yet another fun Jen Fabulous nail tutorial. Of course, Jen’s looked glorious, while mine looked…questionable at best. I was headed to Disney for Labor Day weekend, so I definitely wanted a Disney-inspired manicure. After several failed Mickey silhouettes, I decided to try my hand at this Little Mermaid one. Things were looking great until Ariel’s seashell bikini top. Oops.

I know I’ve been MIA, but I was busy celebrating my birthday! It was a great week (yes, I milk it for as long as I can), but I’m ready to jump back into the blog full force. I can’t think of a better way to come back than with Nails of the Month!
1. My Little Pony; when choosing these fun, pastel colors, I couldn’t help but think of MLP. Growing up, it was my favorite cartoon and I must admit, I am still enamored by all the pretty ponies. This is the same ombre as last month, just with a third color added for more depth. I used Essie’s Bottle Service and Play Date, along with Savina’s Light Mist.
2. Pinkie; sometimes I can do simple. Super embarrassing to admit, but I forgot I had this Essie shade. I discovered it while cleaning out my overflowing polish rack (first world problems). Bottle Service is a super bright and punchy pink: perfect for the summer. If you want to go full on neon, add a white base coat underneath.
3. Half moon; another great tutorial by the wonderful MissJenFabulous. What I loved about this one is how deceivingly EASY it is. This is one of those manicures that got attention everywhere I went from friends down to straight up strangers. I’ve tried half moon manicures before, but they have required taping the portion of your nail you’d like mooned, which always ended up really messy and at least for me, the tape would rip off my nail polish 80% of the time. With this tutorial, Jen suggested painting the nail in full in whatever color you wanted to be the accent moon (in this case, Essie’s No Place Like Chrome) and then painting over it in the top shade, just ending short to create the half moon effect (I used Lime Crime’s Peaches & Cream). How easy is that????

Say hello to a new feature!!!
I’m pretty sure everyone knows by now that I kind of have a problem with nail polish. Namely, my collection looks like something you find at a beauty salon and I may recite the name of Essie colors like they were my children’s. But hey! Everyone has their vices, right? I could do a lot worse than nail polish. 😉
So I’ll be chronicling all my manicures for the month and then linking the tutorials I followed (if they are all fancy-like), and the colors I used, since I get a lot of comments/questions when I post them on my Instagram. This way, I can share the information with all you guys, while also reviewing some shades at the same time! Like it? Good!
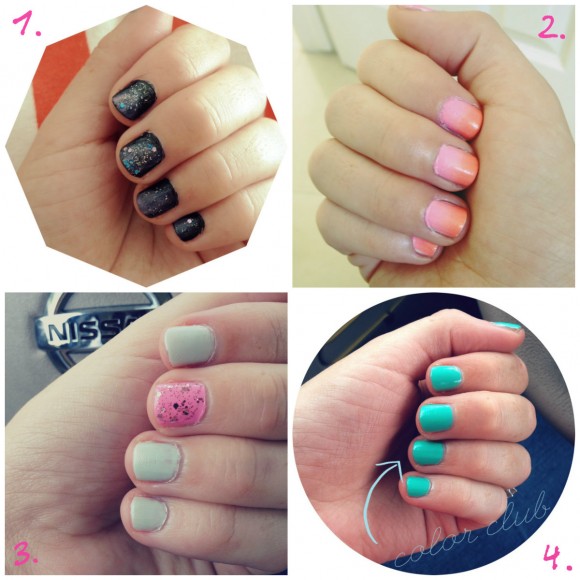
1: Galaxy nails; This one was super fun, and surprisingly easy! As long as you have a variety of shades (I don’t have that problem – heh), you should be good to go. Especially when you are following this fantastic tutorial. The colors I used were China Glaze’s Smoke & Ashes for the base, along with Sinful Colors’ Love Nails, Essie’s Boom Boom Room, Savina’s Light Mist & N.Y.C.’s Starry Silver Glitter.
2: Ombre nails; So after such a kick ass tutorial, I decided to subscribe to MissJenFabulous‘ videos, and found that her ombre how to was her top rated. Naturally, I had to give it a try. This one? Even easier than the galaxy nails! Since my nails are so short, I decided to only choose 2 colors, but next time I’m going to go big and try 3. Also, here’s a tip: I personally think you should choose really bright hues that are not similar for the best effect. You may not be able to note the ombre effect if they are too close in hue. Don’t be timid! I used Essie’s Tart Deco & Boom Boom Room.
3: Fancy nails; I’m a big fan of the fancy nail. It just gives a simple manicure that omph that makes it special. Unfortunately, I really needed that with this mani because I was pretty disappointed with the main shade, Essie’s Absolutely Shore. As you see, it’s not very opaque, and that was after like 4-5 coats! Not my favorite color…For the fanciness, I used Essie’s Boom Boom Room again (didn’t realize how much I used it in June) layered with Essie’s Over the Top.
4: Color club; After several recommendations from another polish-obsessed friend, I decided to give Color Club a try. As their name suggests, they carry some pretty fun hues that are very pigmented, so naturally I was drawn to the brights. The one that really caught my eye was Age of Aquarius, this amazing aqua. It is simply the perfect shade for summer. New favorite! Best part? They come in for a lot less than Essie, China Glaze or O.P.I. and (at least in my experience) last so much longer!